Be ready before the snowflakes fall. This printable checklist helps you prepare for a snowstorm
so you can stay safe, warm, and cozy at home for 3–5 days, even if you’re snowed in.
🍂 🍁 🍂
❄️ Before the Storm
🧹 Outdoor & Snow Removal
Snow shovel
Snow pusher (wide shovel)
Ice scraper or metal shovel edge
Rock salt or ice melt
Pet-safe ice melt (if needed)
Clear drains & pathways
🚗 Vehicle Prep
Gas tank at least half full
Snow brush & ice scraper in car
Emergency blanket in trunk
Park away from plow paths
🍂 🍁 🍂
🏠 Inside the House
🔦 Power & Safety
Flashlights (one per room if possible)
Battery-powered lanterns
Extra batteries
Portable phone chargers / power banks
Candles + matches (used safely, never unattended)
Working smoke & carbon monoxide detectors
🥫 Food & Water (3–5 Days)
Bottled water (about 1 gallon per person per day)
Canned soups & vegetables
Pasta, rice, or oatmeal
Peanut butter
Crackers or bread
Shelf-stable snacks
Coffee, tea, or cocoa
🍂 🍁 🍂
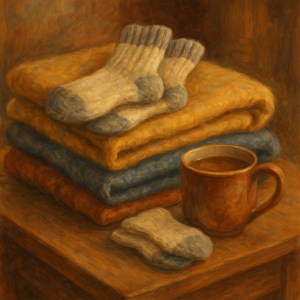
🧣 Warmth & Comfort
Extra blankets
Warm socks & layered clothing
Slippers or indoor shoes
Books, games, and chargers for devices
🍂 🍁 🍂
🐾 Pet & Family Care
Extra pet food and treats
Pet medications
Towels for muddy or salty paws
Diapers, wipes, and baby needs (if applicable)
🍂 🍁 🍂
🌨️ During the Storm
Shovel early and often while snow is light
Re-salt icy areas as needed
Stay off roads unless truly necessary
Keep fridge and freezer doors closed during outages
Check on neighbors if it’s safe to do so
🍂 🍁 🍂
👨👩👧 How Our Family Gets Ready for a Snowstorm
When a big snowstorm is coming, our family gets ready before the snow falls so we can
stay warm, safe, and cozy together at home.
We get ready outside: We put our shovels by the door, sprinkle salt on
slippery steps, and make sure paths are clear. Snow is easier to shovel when it’s fresh!
We prepare for power outages: We gather flashlights, charge phones, and
keep lanterns nearby. If we use candles, an adult is always in the room.
We stock cozy foods: We choose easy meals like soup, oatmeal, and snacks.
Warm drinks like tea or cocoa make storm days feel extra special.
We stay warm: We wear layers, use blankets, and keep the house cozy without
turning the heat up too high.
We take care of pets: Pets get extra food, dry paws, and shorter outdoor
trips. Salt can hurt paws, so we wipe them gently after walks.
We enjoy being snowed in: Snow days are perfect for board games, reading,
family meals, and quiet time together.
🌨️ Snow outside. Warmth inside. That’s how we do winter.
How to Protect Your Garden From Frost & Coastal Winds
A Beginner-Friendly Guide for Forked River, NJ (Zone 7a)
Even in winter, your New Jersey garden can rest safely with a little protection.
If you live in Forked River, New Jersey, or anywhere along the Jersey Shore, winter brings two invisible troublemakers to your garden: frost and coastal winds. You don’t even need deep snow for damage to happen. Cold, dry wind and salty air can quietly burn leaves, dry out roots, and weaken plants long before spring arrives.
The good news? With a few simple steps, you can keep your garden safe all winter long—even if you’re a total beginner and have never protected a plant before.
What Frost Actually Does to Your Plants
Frost happens when temperatures drop low enough that the water inside plant cells begins to freeze. This causes:
Blackened or mushy leaves
Drooping or collapsed stems
Split or cracked tissue
Root damage below the soil line
Once frost damage appears, it can’t be undone. That’s why our focus is on prevention. Think of frost protection as tucking your garden in for the night with a warm blanket.
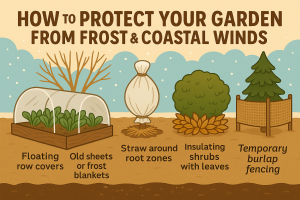
Step 1: Cover Plants With Frost Cloth or Old Sheets
A simple cloth barrier traps the day’s warmth and shields plants from frost.
The easiest way to protect tender plants from frost is to cover them. You can use:
How to do it (even if you’ve never tried this before):
Check the forecast. If temperatures are expected to drop near or below freezing overnight, plan to cover your plants before sunset.
Gently drape the cloth or row cover over your plants. It should look loose and tent-like, not tight.
Use rocks, bricks, or small stakes to weigh down the edges so the wind can’t lift it away.
In the morning, once temperatures rise above freezing, remove the cover so plants can get sun and air.
Important: Avoid laying plastic directly on leaves. Plastic can actually make frost damage worse by holding cold right against the plant.
Step 2: Insulate the Roots With Straw and Mulch
A cozy layer of straw or mulch keeps roots warmer and more stable through freezing nights.
Roots are the heart of the plant. Even if the top freezes, plants often survive as long as their roots stay protected. In coastal New Jersey, where temperatures swing above and below freezing, a good root blanket is essential.
Use materials like:
Clean straw
Shredded leaves
Bark mulch or wood chips
How to apply it:
Wait until the ground has cooled but before it’s deeply frozen.
Spread a 2–4 inch layer of mulch around the base of each plant.
Keep mulch a little bit away from the main stem or trunk to avoid rot.
For shrubs like roses or lavender, you can also gently pile dry leaves around the base for extra insulation.
How Coastal Winds Damage Your Garden
Along the Jersey Shore, winter damage isn’t just about cold temperatures. Strong winds can:
Pull moisture out of leaves, leaving them dry and burned
Dry out soil and roots faster than you’d expect
Make plants feel colder than the actual air temperature
This is called wind burn, and it can happen even when the thermometer doesn’t look that scary. That’s why wind protection is just as important as frost protection.
Step 3: Create a Burlap Wind Barrier
A simple burlap fence slows cold coastal winds before they hit your plants.
What you’ll need:
Wooden or metal stakes
Roll of burlap
Twine or zip ties
How to set it up:
Find the direction the strongest winter winds usually come from (often from the northwest).
Drive stakes into the ground in a line a few feet in front of your plants.
Attach the burlap to the stakes, creating a low fence or “wall.”
Make sure the barrier is solid enough to slow the wind, but not airtight.
You’re not trying to block all the wind, just to soften the hit before it reaches your plants.
Step 4: Move Containers Against the House
Walls, foundations, and sheltered corners create warmer microclimates for container plants.
Containers are more vulnerable to cold because their roots are above ground and exposed on all sides. One of the easiest ways to protect them is to take advantage of your house’s natural warmth.
For winter in Forked River, try this:
Move pots close to an exterior wall, especially brick or stone.
Choose spots that are out of the direct wind: near doors, on a porch, or beside a fence.
Group pots together so they can share a pocket of warmer air.
You’ve just created a microclimate—a tiny, calmer, slightly warmer world for your plants.
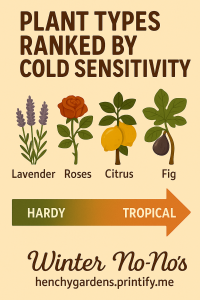
Which Plants Need Extra Protection in Coastal New Jersey?
Not every plant needs pampering. Some are naturally tougher, while others are more sensitive to frost and wind. In Zone 7a, pay special attention to these:
Some plants are hardy workhorses; others need a little extra winter love.
Roses
Roses dislike harsh winter wind and temperature swings.
Mound mulch or leaves around the base, and consider a burlap barrier if they’re in a windy spot.
Lavender
Lavender prefers dry roots. Give it good drainage and a light mulch, and avoid letting wet, heavy soil sit around the base all winter.
Young Fruit Trees
Thin bark and young roots are easily damaged. Wrap trunks with tree wrap or burlap and add mulch around the root zone (but not touching the trunk).
Citrus in Containers
Citrus is not naturally hardy in New Jersey. Move these pots into a garage, enclosed porch, or bright indoor spot before hard freezes arrive.
Fig Trees
Figs can survive here with help. Wrap them in burlap, add leaves or straw around the base, and use a wind barrier if they’re in an exposed spot.
🌬️ Remember: Wind burns roots long before frost kills leaves. If you protect the roots and soften the wind, you’ve already done the most important winter work.
December may feel like the gardening “off-season,” but in coastal New Jersey your garden is very much alive just resting.
Think of this month as your quiet setup phase: you’re tucking the garden in, protecting what you have, and gently learning the basics so spring feels exciting, not overwhelming.
Good news: Follow this even if you have never gardened before.
Drop a close-up of your raised beds or winter garden here.
✅ Outdoor Garden Tasks
1. Remove diseased plants (don’t compost them)
Look for: mold, black or brown spots, mushy stems,
or plants that rotted during fall.
Put on gloves and pull the whole plant out, roots and all.
Bag it for the trash/municipal yard waste
(not your compost pile).
Wash your hands and wipe your tools when you’re done.
If a plant simply turned brown from cold but wasn’t sick, you can compost it. When in doubt, throw it out.
2. Cut back perennials (leave a winter “stump”)
Perennials are plants that come back every year, like hostas, coneflowers, and black-eyed Susans.
Snip the dead, brown stems so that 2–3 inches remain above the soil.
Skip cutting roses, evergreens, and lavender unless the growth is clearly dead.
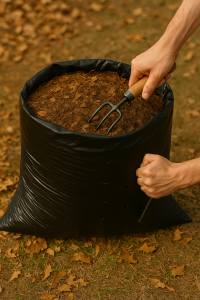
3. Mulch garden beds (a blanket for the soil)
Use shredded leaves, straw, pine needles, or wood chips.
Spread a 2–4 inch layer over bare soil.
Keep mulch slightly away from plant stems and tree trunks.
Why: mulch keeps roots warmer, slows weeds, and gently feeds your soil.
4. Protect shrubs & young trees from wind
Cold wind can dry plants out more than snow.
Wrap young trees, hydrangeas, roses, boxwoods, and blueberries.
Use burlap, frost cloth, or an old sheet (never plastic).
Wrap loosely so air can move and secure with string or twine.
5. Water before a deep freeze
Why: moist soil protects roots better than bone-dry soil.
Water beds, shrubs, and young trees a day or two before a big freeze.
Focus on raised beds, garlic, and any overwintering vegetables.
✅ Indoor Garden Tasks
1. Start microgreens (7–14 day harvest)
Microgreens are tiny, edible baby plants that you harvest when they’re 2–3 inches tall.
Use a shallow container with drainage holes and fill with potting soil.
Sprinkle seeds (broccoli, radish, peas, sunflower) thickly over the top.
Mist with water so the soil is moist but not soggy.
Cover loosely for 2–3 days, then uncover and place in bright light.
Cut with scissors when they reach 2–3 inches tall and enjoy.
2. Grow windowsill herbs
Great beginner choices: basil, parsley, chives, thyme, and mint.
Plant each in a small pot with a drainage hole.
Place them in a bright window (south-facing is ideal).
Water when the top inch of soil feels dry instead of on a schedule.
3. Inspect & clean garden tools
Clean tools last longer and are less likely to spread disease.
Brush or wipe off dried dirt.
Wash with warm, soapy water if needed.
Dry completely and store in a dry spot.
4. Organize seeds & supplies
Gather all seed packets in one place.
Check dates and toss any that are very old or moldy.
Sort into vegetables, herbs, and flowers so spring planning is easy.
Family garden tip
December is “dream and plan” month for kids.
Let them look through seed catalogs and circle plants they like.
Give them a page in a “garden journal” to name their future plants.
Let them help choose which microgreens or herbs to grow indoors.
This builds ownership and excitement long before the first seed touches the soil.
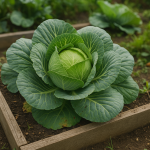
In the Henchy Gardens beds, cabbage is that quiet, dependable friend who doesn’t mind
a frosty morning and still shows up bursting with life. While many warm-season crops are
packing up for the year, cabbage is just getting cozy, curling its leaves tighter and
tighter into that beautiful green globe we love to shred, roast, and tuck into soups.
Cabbage is more than coleslaw and soup filler—it’s a true cold-weather superfood. It’s rich in vitamins, fiber, and protective plant compounds, yet budget-friendly and easy to grow, especially in raised beds where soil conditions can be tailored just right.
Why Cabbage Is So Good for You
Cabbage belongs to the brassica family (along with broccoli, kale, and Brussels
sprouts). These are some of the most studied vegetables in nutrition science because of
their powerful combination of vitamins, minerals, fiber, and unique sulfur compounds
called glucosinolates.
In a single cup of raw cabbage you’ll typically find:
Vitamin C – for immune support and antioxidant protection.
Vitamin K – important for blood clotting and bone health.
Folate & B vitamins – support energy and cellular repair.
Fiber – keeps digestion moving and helps feed good gut bacteria.
Potassium – supports healthy blood pressure.
Very few calories & carbs – making it friendly for weight management and many blood-sugar–conscious eating plans.
Health Benefits at a Glance
Supports digestion & gut health
Helps lower cholesterol
Anti-inflammatory compounds
Rich in antioxidants
Supports heart & blood pressure
May offer anti-cancer protection
Low-calorie, high-satiety food
Can be friendly for Type 2 diabetics*
Friendly reminder: Cabbage can be a wonderful part of a
Type 2 diabetic-conscious plate because it’s low in carbohydrates and high in fiber.
However, every body is unique—always check with a healthcare professional or registered
dietitian about how cabbage fits into your specific plan.
Cabbage Loves the Cold – Here’s Why
While tomatoes shiver and basil sulks, cabbage is out there humming happily in the cool air.
As a classic cool-season crop, cabbage actually prefers temperatures between
about 45–70°F (7–21°C). Light frosts can even sweeten the flavor as the plant
concentrates natural sugars in its leaves.
This makes cabbage a perfect choice for fall and early-winter gardening,
especially in raised beds. The beds warm up and drain better than in-ground plots, helping
roots stay comfortable even as the air gets nippy.
Growing Cabbage in a Raised Bed
From seedling to supper
1. Soil & Bed Preparation
Cabbage likes a rich, well-drained soil with plenty of organic matter.
In Henchy Gardens, we think of the raised bed as a cozy quilt: layers of goodness that keep
roots happy and well-fed.
Aim for a soil pH around 6.2–6.8.
Mix in finished compost or aged manure before planting.
Because cabbage is a “heavy feeder,” you can also add a balanced organic fertilizer or slow-release pellets at planting time.
2. Timing for Cool-Season Success
In many temperate areas, you’ll:
Start seeds indoors in late summer for a fall crop, or
Transplant nursery seedlings into the raised bed as late-summer heat breaks.
Once overnight temperatures drift down into the 50s and 40s°F (10–7°C), cabbage really finds its groove.
A row cover or light frost cloth can protect young plants from a surprise hard freeze while still letting the cold they love come through.
3. Spacing and Planting
Give each plant enough room to curl into a full head:
Space plants about 12–18 inches (30–45 cm) apart in all directions.
Plant seedlings a bit deeper than they were in their pots so stems are well-anchored.
Water in deeply after planting to settle roots and remove air pockets.
From raised bed to basket – the most satisfying moment in the cabbage story.
4. Water, Feeding & Mulch
Cabbage likes consistent moisture, especially as those heads are forming.
Water deeply rather than with frequent sprinkles—about 1–1.5 inches (2.5–4 cm) of water per week, including rainfall.
Top-dress with compost or a light feeding of organic fertilizer midway through the season.
Add a layer of straw, shredded leaves, or mulch to keep soil cool and retain moisture.
5. Pests & Protection (The Gentle Watch)
Cool weather greatly reduces pest pressure, but brassicas still have a few fans that love to snack:
Cabbage worms & loopers: Hand-pick any you see, or use a row cover from the start to block cabbage moths.
Slugs: Mulch carefully and use traps or copper barriers if they become a problem.
Rotate crops: Don’t grow cabbage in the same bed year after year—rotate with non-brassicas to keep soil disease down.
6. Harvesting & Storing
Cabbage is ready to harvest when heads feel firm and solid when gently squeezed.
Use a sharp knife to cut the stem just above the outer leaves.
Leave the outer leaves and base in the soil and sometimes smaller “side heads” will form.
Store whole heads in a cool, humid place or the crisper drawer for several weeks.
For longer storage, shred and ferment into sauerkraut or kimchi—your gut microbes will thank you.
Bringing It to the Table
Once your garden has gifted you a basket of dense, cold-kissed cabbages, the fun really begins.
Shred it into a crunchy salad with apple and carrot, braise it with onions and a splash of vinegar,
or roast thick wedges until the edges caramelize and turn sweet.
In the Henchy Gardens kitchen, we think of cabbage as a “bridge vegetable”—it carries us from late summer into winter, keeping plates
colorful and nutrient-rich even as the days grow short. It’s affordable, adaptable, and forgiving
both in the soil and on the stove.
Next time you walk past a humble head of cabbage at the market or in your own raised bed, give it a little nod. Inside those leaves is a whole story of cool mornings, quiet growth, and an armful of goodness for your family table.
From our beds to your table – may your cabbage be crisp, your soil rich, and your mornings just frosty enough.
A daisy-trimmed, step-by-step guide to leaf mulch with black contractor bags.
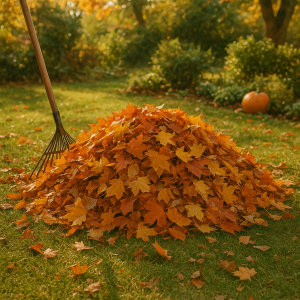
Step 1: Gather the Season’s Story
Gather your tools needed.
Rake
Trash Bags
Pitch fork
hose compost (Optional)
Rake leaves from lawns, paths, and beds. Remove twigs and cones. Shred with a mower if possible small pieces break down faster.
Papa’s Tip: Shredding helps breakdown quicker.
🌼 🌼 🌼 🌼 🌼 🌼 🌼
Step 2: Fill the Black Bags of Possibility
Use heavy-duty black contractor bags (3 mil+). Fill each bag about ¾ full with shredded leaves so there’s room for air and mixing.
🌼 🌼 🌼 🌼 🌼 🌼 🌼
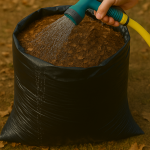
Step 3: Add a Touch of Rain
Moisten leaves until they feel like a wrung-out sponge. Too dry and they stall; too wet and they go slimy. Aim for damp.
Papa’s Tip: If they crunch, add water. If they squish, add holes.
🌼 🌼 🌼 🌼 🌼 🌼 🌼
Step 4: Sprinkle in the Garden’s Secret Ingredients
Add a handful of garden soil or finished compost for microbes. For speed, mix in a little grass clippings or a pinch of organic fertilizer (blood meal).
Soil/compost = microbial starter
Grass clippings = nitrogen boost
Organic fertilizer (optional) = accelerator
🌼 🌼 🌼 🌼 🌼 🌼 🌼
Step 5: Let Them Breathe
Poke a dozen small holes around each bag — sides and bottom — to invite airflow and prevent slimy breakdown.
🌼 🌼 🌼 🌼 🌼 🌼 🌼
Step 6: Find a Sunny Spot to Dream
Set bags in sun or light shade. Every few weeks, shake to mix and mist if dry.
4–6 months: soft, earthy leaf mulch
9–12 months: dark, crumbly leaf mold
🌼 🌼 🌼 🌼 🌼 🌼 🌼
Step 7: Spread the Magic
Spread mulch around beds about 2 inches thick. For soil enrichment, work leaf mold into beds or use as a top-dress.
“In every crinkled leaf lies a promise of what once fell from the tree and will rise again in bloom.” — Papa Sunflower
Part of the Henchy Family Gardens series — where stories and seedlings grow together.
6 Simple Ways to Keep Your Garden Growing Indoors 🌻
🪴 Winter Doesn’t Mean the Growing Stops 🪴
As temperatures drop and the outdoor beds rest, Henchy Family Gardens comes alive indoors. Winter is the perfect time to nurture a few leafy projects, refresh your soil knowledge, and keep your hands in the dirt — even if it’s just a pot on the windowsill.
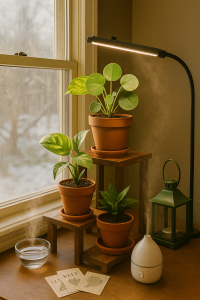
Winter mornings in Mother’s Greenhouse – where the light still grows.
1. 🌿 Start an Indoor Herb Garden
Best herbs for winter: Basil, thyme, parsley, mint, chives.
✅ Henchy Tip: Use small pots with drainage holes and place near a sunny window (6–8 hours of light). Rotate weekly for even growth.
💡 HFG Note: Herbs like basil and thyme make diabetic-friendly seasoning swaps — bold flavor, zero sugar or salt.
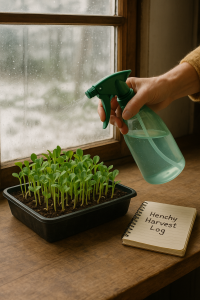
2. 🌱 Grow Microgreens on Your Windowsill!
Fresh life on the sill – microgreens ready in two weeks!
These nutrient-packed sprouts grow fast, ready in just 10–14 days. What to grow: Broccoli, radish, arugula, or kale.
Fill a shallow tray with potting mix.
Scatter seeds evenly.
Mist daily and keep warm.
Snip when 2–3 inches tall.
Perfect toppings for soups, wraps, or omelets — fresh garden flavor in midwinter.
✅ Henchy Tip: Label trays with planting dates so you can stagger harvests every few days.
3. 💧 Boost Humidity & Water Wisely
Dry indoor air can stress plants. Try this:
Cluster plants together to raise humidity.
Set a bowl of water near vents or use a small humidifier.
Water early in the day to prevent mildew.
✅ Henchy Tip: If leaf edges turn crispy, mist gently and move plants a bit farther from heat sources.
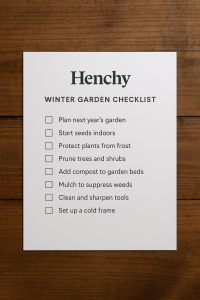
Poppa Sunflower’s handy winter garden checklist.
4. ☀️ Light Makes All the Difference
Short winter days can slow growth — but light management helps:
Choose south-facing windows for best natural sunlight.
Use LED grow lights (12–14 hours per day).
Wipe dust from leaves regularly for stronger photosynthesis.
✅ Henchy Tip: Place a small mirror or white poster board behind your plants to bounce extra light their way.
5. 🪴 Put Outdoor Beds to Rest
Before deep winter sets in:
Clear spent plants and weeds.
Add compost and 2–3 inches of mulch or shredded leaves.
Drain hoses and clean tools.
Bonus Project: Plant garlic cloves or hardy bulbs now — they’ll reward you with early shoots come spring.
✅ Henchy Tip: Mark your garlic rows with garden stakes so you remember where they’re sleeping under the mulch.
From our greenhouse to your heart – warmth, comfort, and garden love.
6. 📔 Plan Your Next Garden Season
Winter is the gardener’s “thinking time.” Record what thrived and what struggled this year. Sketch next year’s bed layout for crop rotation. Browse seed catalogs and order early before the spring rush.
✅ Henchy Tip: Use sticky notes or color codes in your garden journal to organize plant families for rotation.
Winter is for reflection – a quiet time to dream and draw next season’s beds.
🌻 Closing Thought
Gardening in winter isn’t about slowing down — it’s about shifting focus. By tending small projects indoors and preparing your soil outdoors, you’ll nurture steady growth through every season. Growth never stops — it just changes rhythm.
Morning warmth from the heart of Henchy Family Gardens.
How Long Will Tender Crops Last in an Unheated Greenhouse? A Fall Guide for Zone 7
Practical guidance with a warm, storybook heart — from our Jersey Shore greenhouse to yours.
“Every season has its whispers — and in autumn, the greenhouse hums softly, holding on to warmth as long as it can.” 🌿
As the air crisps and the days shorten, many gardeners wonder: how long can tender crops really last in an unheated greenhouse? If you live in Zone 7 — like us here at Henchy Family Gardens on the Jersey Shore — you can stretch your growing season a bit longer than you might think… but not forever. Let’s explore what really happens in that cozy glass shelter when the chill starts to creep in.
🌱 What Counts as a “Tender Crop”?
In gardening, “tender” means frost-sensitive — plants that shiver at the first cold breath of fall. Think: tomatoes, peppers, basil, cucumbers, eggplants, and summer squash. Once greenhouse temps dip below about 50 °F (10 °C), these plants slow down, sulk, and eventually suffer.
☀️ The Greenhouse Effect (and Its Limits)
An unheated greenhouse acts like a sun-powered blanket: by day, sunlight warms the air and soil; by night, that stored heat escapes. A sunny October afternoon can lift inside temps into the 70s °F, but after sunset they slide back toward the 40s °F. That daytime cushion buys a few extra weeks — but it won’t fend off hard cold snaps.
📆 Zone 7’s Typical Fall Window
First outdoor frost: often mid- to late October in Zone 7.
Inside an unheated greenhouse, most tender crops can be coaxed into late October, and sometimes into early November during mild years.
After that, shorter days and longer, colder nights shift plants from producing to merely surviving.
💡 Five Ways to Stretch the Season
Add a second skin: Drape row cover/frost cloth over plants at night.
Use thermal mass: Dark water barrels or stone store daytime heat and release it after dusk.
Seal drafts: Tighten panels, weather-strip doors, and plug sneaky gaps.
Mulch roots: Warmer roots = happier, more resilient plants.
Once nighttime greenhouse temps regularly fall below 45–50 °F, it’s time to thank your summer superstars and welcome the cool-season crew: spinach, kale, lettuces, radishes, carrots, and hardy herbs like parsley and chives. Think of it as the changing of the garden guard — vibrant summer vines hand the baton to steady winter greens.
✨ Quick Takeaway
Crop Type
Likely in Unheated GH (Zone 7)
Notes
Tomatoes & Peppers
Until late Oct / early Nov
Pick promptly before <45 °F nights
Basil & Cucumbers
Mid- to late October
Very frost-sensitive; expect early slowdown
Eggplant
Late October
Fruiting often stalls before real cold
Lettuce, Spinach, Kale
All winter (with cover)
Thrive in cool temps and short days
Root crops (carrot, radish)
Into winter
Excellent for overwintering; sweeten with frost
Keeper’s Note from Henchy Family Gardens
Every fall, we think of our greenhouse as a storyteller’s cabin — warm by day, peaceful by night. The plants rest, the gardener reflects, and the cycle quietly prepares to begin again. Let tender crops linger while they can, but embrace the season’s rhythm. In the garden, every ending is also a beginning. 💛
Written by Raquel Henchy — Keeper of Seeds & Stories Where stories and seedlings grow together. 🌿
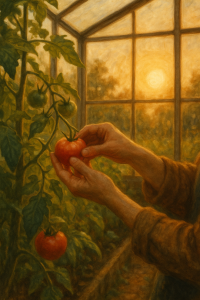
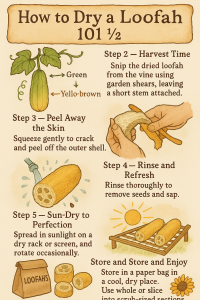
How to Harvest/Dry Loofah the “Henchy Family Gardens” way
Story Start
As golden autumn light settles over your Jersey Shore beds, it’s time to bring your loofah vines from trellis to sponge. This warm, whimsical guide shows you how to harvest Luffa aegyptiaca before frost, finish curing indoors, and create gorgeous natural sponges — practical for your garden-to-table rhythm and mindful of a Type‑2‑diabetic‑friendly lifestyle.
Guide
🗓️ Know Your First Frost Date & Assess Maturity
On The Jersey Shore, NJ, first frost typically arrives in late October to early November — your loofah’s finish line. Loofahs like a long, warm season of about 200 frost-free days. If a hard frost is forecast and your gourds are still partly green, harvest early to prevent damage.
🥒 Signs the Gourds Are Ready (or Nearly Ready)
Skin Color: green → yellow-brown → tan.
Texture & Weight: shell feels slightly loose; fruit feels lighter for its size.
Sound: shake and listen for a seed rattle.
Vine Health: yellowing/dieback or imminent frost means it’s time to harvest.
✂️ Harvesting Before Frost — Step-by-Step
Cut, don’t pull: use sharp shears/knife and leave 1–2″ of stem.
Inspect: process any with black/soft spots first.
Move inside: finish curing in a sunny, airy spot if it’s cold or damp outside.
🌞 Processing & Drying After Harvest
Peel: as shells loosen, crack and peel; soak briefly if stubborn.
Remove seeds: shake out or trim an end; save for next year.
Rinse: warm water; optional dip in 10% bleach or vinegar solution for brightness.
Dry fully: rack with good airflow; rotate to prevent mold.
🌼 Henchy’s Jersey-Shore Harvest Tips
Timing: choose a mild, dry spell so gourds cure evenly.
Edible vs. Sponge: very young green loofahs are edible; matured tan gourds are for sponges.
Whimsy: cure or hang in “Mother’s Greenhouse” for that warm, storybook glow.
Cozy Setup
🏡 Garage Drying — Cozy, Coastal Edition
🌿 Conditions
Temperature: 50–75°F (10–24°C)
Humidity: < 60% if possible
Airflow: hang or rack; never stack flat
Light: indirect sunlight
🌻 Setup Steps
Brush off dirt (don’t wash yet).
Hang individually with twine/raffia for rustic charm.
Add a small fan for steady airflow.
Rotate occasionally; remove any soft/moldy fruits.
Typical cure time:2–4 weeks, depending on humidity.
🍂 Optional Pre-Dry Indoors
If harvested damp or slightly green, let loofahs rest indoors for 24 hours in a warm, dry room, then move them to the garage/greenhouse to finish.
💛 After Curing
Peel remaining skin.
Shake out seeds.
Rinse, sanitize (optional), and air-dry several days more.
Enjoy beautiful, natural eco-sponges for baths, dishes, and gift baskets.
🌻 Bonus: Understanding the Loofah’s Nature
The loofah is a cucurbit (family Cucurbitaceae) alongside cucumbers, squash, and pumpkins. As it matures, the inner flesh forms a dense fibrous network — the sponge you reveal after peeling and drying.
Outer Skin: firm and green when fresh; papery when dry.
Flesh: spongy parenchyma that supports fiber formation.
Fibrous Network: the vascular skeleton of the sponge.
Seeds: dark, oval, and numerous — next year’s promise.
Loofah anatomy — what you reveal after curing and peeling.
What Every Gardener Should Know When the Forecast Says “Frost Watch”
As the evenings grow crisp here at the Jersey Shore, gardeners in USDA Growing Zone 7 — including our community in 08731 — start hearing those familiar words from local forecasts: “Frost Watch.”
But what does that really mean, especially when your thermometer still reads 44°F? Let’s dig in together and uncover the science, the signs, and the simple ways to protect your garden family from Jack Frost’s surprise visits.
“Frost is the garden’s whisper that every ending holds a promise — that rest is not the death of beauty, but its preparation to bloom again.”
— Henchy Family Gardens
🌱 What Is a Frost, Really?
“When the air turns still and silver, even the smallest leaf remembers how to sparkle.”
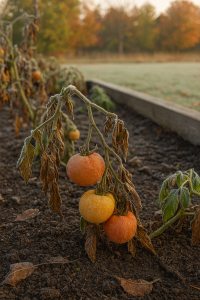
A frost happens when air temperatures drop to around 32°F (0°C) or below, and moisture in the air crystallizes directly onto plant surfaces — those tiny ice crystals you see on petals and leaves in the morning.
Light Frost (29–32°F): May damage or kill tender plants such as basil, peppers, or impatiens.
Moderate Frost (25–28°F): Hardier plants begin to feel it — tomatoes, beans, and annual flowers are at risk.
Hard Freeze (below 25°F): Most unprotected vegetation suffers serious damage, marking the end of the growing season for warm-weather crops.
🧭 Typical Frost Dates for Zone 7
(Southern NJ)
In our coastal region, the average first frost arrives around mid-to-late October, and the last spring frost usually passes by mid-April. That gives gardeners roughly a 200-day growing season — long enough to enjoy multiple harvests and plenty of flowers before the cold sets in.
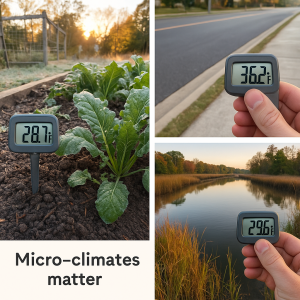
🌤 Henchy Tip: Microclimates can change everything — gardens tucked beside fences or stone walls often stay warmer longer than open spaces.
🌤 Why You Can Get a Frost Warning at 44°F
It might sound strange, but a frost watch can be issued even when the forecast temperature is in the low-to-mid 40s. Here’s why:
Clear skies allow heat to escape rapidly after sunset.
Calm winds mean there’s no air movement to keep temperatures mixed.
Low-lying garden beds can be several degrees cooler than official readings.
Surface temperatures — the air just above your plants — can dip to freezing even while your thermometer reads higher.
Think of it as a quiet, invisible chill that creeps in overnight — gentle but enough to nip tender leaves if left uncovered.
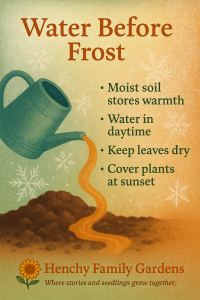
🪴 What to Do When Frost Is in the Forecast
🌼 Cover tender plants with old sheets, burlap, or frost cloth before sunset.
🏡 Bring containers indoors or group them near a protected wall.
💧 Water the soil lightly — moist soil holds heat better than dry soil.
🌤 Uncover in the morning once the sun rises and temperatures climb.
🌾 Check microclimates: garden corners, dips, and near fences may freeze first.
“The frost may nip the petals, but it can’t stop the gardener’s heart from blooming.”
💛 A Final Word from the Garden 💛
At Henchy Family Gardens, we see frost as more than just a seasonal warning — it’s a gentle reminder that every garden (and every gardener) moves through seasons of rest and renewal.
So when that cool air rolls in and your garden glistens under the morning dew, take a deep breath. Protect what you can, learn what nature teaches, and trust that spring will always follow.
🌻 Henchy Family Gardens “Where stories and seedlings grow together.”
When it comes to gardening, success doesn’t just come from good soil and sunshine — it also comes from planning. One of the most useful tools every gardener can use is a garden map.
Whether you’re growing in raised beds, rows, or containers, mapping out your garden before planting sets you up for a more abundant, beautiful, and stress-free season.
🌿 What Is Garden Mapping?
Garden mapping is simply creating a visual layout of your garden space before planting. It can be as simple as a sketch in a notebook or as advanced as a digital plan. A map helps you organize where each crop will grow and allows you to make thoughtful decisions instead of planting on the fly.
🌻 Why Garden Mapping Matters
1. Maximizes Space
No more guessing where to put your tomatoes or realizing too late that your cucumbers crowded out your lettuce. Mapping ensures you use every inch efficiently.
2. Helps with Crop Rotation
Planting the same crop in the same spot year after year can drain the soil and attract pests. A map lets you track what grew where so you can rotate properly, keeping soil healthy and plants strong.
3. Prevents Overcrowding
It’s easy to underestimate how large plants will get. A map keeps you from planting too close together, improving airflow and reducing disease.
4. Keeps Sun & Shade in Mind
Tall plants like corn or sunflowers can cast shade on smaller crops. Mapping ensures each plant gets the right amount of light.
5. Simplifies Succession Planting
Want to plant spinach in spring, then beans in the same spot later? A map helps you plan out the timing and space for multiple plantings.
6. Tracks Your Progress Year to Year
Your map becomes a garden diary. Looking back helps you see what worked, what didn’t, and how to improve next season.
🥕 How to Make a Garden Map
Measure Your Space – Note the dimensions of your beds, rows, or containers.
Sketch It Out – Draw a simple layout with boxes or shapes representing your growing areas.
Mark Permanent Features – Trees, trellises, walkways, and greenhouses should go in first.
Plan Plant Placement – Place taller crops where they won’t shade smaller ones. Keep companions together (like basil near tomatoes).
Consider Timing – Leave room for succession planting — early crops out, summer crops in.
Label Clearly – Write crop names on the map so you know exactly what’s where.
🌸 Tools You Can Use
Paper & Pencil – The simplest way!
Graph Paper – Makes spacing easier.
Garden Journals – Many include mapping sections.
Online Tools & Apps – Some garden apps let you drag and drop plants digitally.
🌿 Final Thoughts
Garden mapping is more than just organization — it’s a way to set yourself up for success, abundance, and peace of mind in the garden.
Think of it as your blueprint for a fruitful season. 🌻
✨ Just like tending your plants, tending your plan brings better harvests.


 🐾 Pet & Family Care
 We prepare for power outages: We gather flashlights, charge phones, and

 How to Protect Your Garden From Frost & Coastal Winds


 🌞 Processing & Drying After Harvest
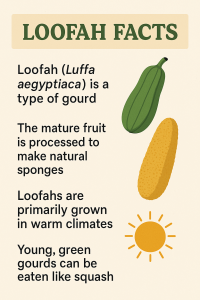 🌿 Conditions
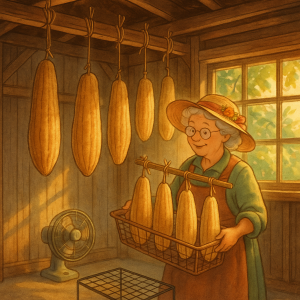 If harvested damp or slightly green, let loofahs rest indoors for 24 hours in a warm, dry room, then move them to the garage/greenhouse to finish.
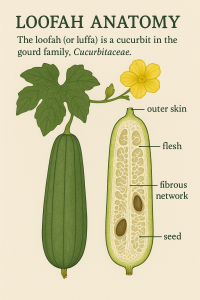


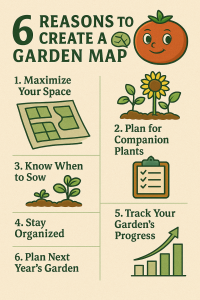 1. Maximizes Space